1.开发环境
myeclipse 8.5 tomcat 5.5 jdk 1.6
2.又见hello world之j2se版。
http://kin111.blog.51cto.com/738881/171031/
通过xml对beans的描述,使用spring框架动态的反射出所需要的实体类。
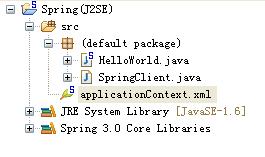
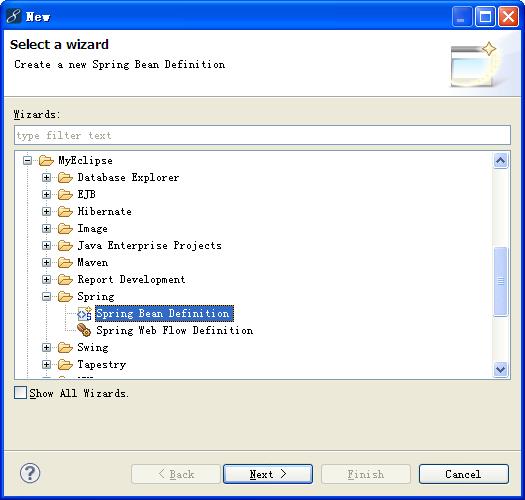
首先使用myeclipse新建一个web工程,然后添加spring Capabilities。将自动生成的applicationContext.xml放在src目录中。新建两个类:HelloWorld和SpringClient.代码如下:
applicationContext.xml文件:
文件的目录结构如下:
直接运行SpringClient,可能产生如下的warnings:
解决的办法就是src目录中添加log4j.properties 文件。文件内容如下:
再次运行SpringClient程序,程序只是简单的输出hello world这个亲切的字符串。
3.hello world之j2ee web版。
http://maestric.com/doc/java/spring/hello_world
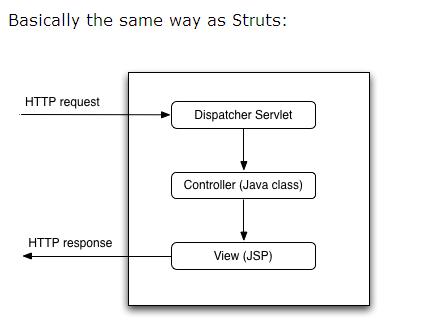
In 'WEB-INF/web.xml', we declare Spring DispatcherServlet and map '*.html' URLs to it:
Let's now create the Spring configuration file 'WEB-INF/springmvc-servlet.xml' (name based on the servlet name above):
Map URL /hello_world.html to Controller HelloWorldController
Declare View Resolver: when view 'view_name' is called (from the Controller), the file '/jsp/view_name.jsp' will be used
在myeclipse中可以使用下面的方法生成简单的模板:
Let's create the Controller 'WEB-INF/src/springmvc/web/HelloWorldController.java':
Now the view: 'jsp/hello_world.jsp':
将整个的web工程deploy之后,打开:http://localhost:8180/springmvc/hello_world.html,如果一切正常的话,将显示“
This is my message: Hello World MVC!”字符串(由controller传递给页面)。
spring的hello world完毕,其中的主要意义是了解整个spring开发流程,忽略了其中的很多的细节的问题。
分享到:


相关推荐
Spring4 HelloWorld初学Spring,java bean通过applicationContext.xml配置SpringIoC容器生成。
你好,世界收藏 制作“ Hello World!” 我可以使用的所有语言的程序!
Spring技术内幕:深入解析Spring架构与设计原理(第2版) .pdf
手把手教你如何快速搭建spring mvc环境.zip
1. 先配置 nacos server 2. 启动 ProviderApplication.java类 3. 启动 ConsumerApplication.java类 4. 浏览器中输入 http://localhost:8082/say/hello
手写Spring框架之: HelloSpring
Spring3MVC-REST-HelloWorld 实例简单代码
Spring技术内幕:深入解析Spring架构与设计原理(第2部分) 《Spring技术内幕:深入解析Spring架构与设计原理》是Spring领域的问鼎之作,由业界拥有10余年开发经验的资深Java专家亲自执笔!Java开发者社区和Spring...
Spring Boot学习笔记-------(二)spring boot入门,配套例子代码,博客地址:https://blog.csdn.net/huaya1127/article/details/104130300
博文链接:https://hintcnuie.iteye.com/blog/198673
spring和rabbitmq整合的helloworld
第一次共享自己的代码,Spring Hello World。代码比较简单,适合初学者,入门使用。高手就不要下载。呵呵。
[INFO] SpringStart:SpringStart:war:V1.0.0 [INFO] +- log4j:log4j:jar:1.2.17:compile [INFO] +- org.apache.openejb:javaee-api:jar:5.0-1:provided [INFO] +- javax.faces:jsf-api:jar:1.2_04:provided [INFO] +...
SPRING技术内幕:深入解析SPRING架构与设计原理SPRING技术内幕:深入解析SPRING架构与设计原理SPRING技术内幕:深入解析SPRING架构与设计原理SPRING技术内幕:深入解析SPRING架构与设计原理SPRING技术内幕:深入解析...
根据学习笔记整理的HelloWorld,需要自行下载Spring3相关的包
《Spring技术内幕:深入解析Spring架构与设计原理(第2版)》是国内一本系统分析Spring源代码的著作,也是Spring领域的问鼎之作,由业界拥有10余年开发经验的专业Java专家亲自执笔,Java开发者社区和Spring开发者...
使用SpringData JPA来简化数据库操作的基本实现步骤
spring-mvc-helloworld 可以通过jetty启动,访问 http://localhost:8010/spring-mvc-helloworld/hello/world
这是spring MVC的HelloWorld完整实例,包含jar包
博客示例代码,Spring boot 自学笔记(一) hello world 代码